An animated retro-arcade clock on a 128x64 RGB LED matrix, driven by an ESP32-S3.

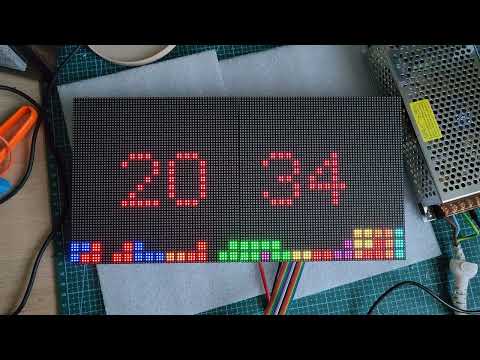

Fourteen clock styles plus a Cycle All mode (Mario, Space Invaders, Pac-Man, Snake, Tetris, Asteroids, Dino Runner, Matrix Rain, Weather and more), configurable from a built-in web interface: per-element sprite colors, brightness with scheduled night dimming, timezone selection with automatic DST, and OTA updates. It can also act as a PC performance monitor, showing live CPU/GPU/RAM/network stats sent by a desktop companion app.
Looking for the small OLED version? See the sibling project SmallOLED-PCMonitor.
| Part | Notes |
|---|---|
| ESP32-S3 board | ESP32-S3-WROOM-1 (N16R8) devkit or Waveshare ESP32-S3-Zero. Compatible Super Mini boards also work; check that the particular board exposes GPIO 1, 2, 4-14 and 38 without conflicts |
| Alternative: Waveshare ESP32-S3-RGB-Matrix | Purpose-built HUB75 driver board (ESP32-S3-WROOM-2-N32R16V, 32MB flash, 16MB PSRAM). Carries the HUB75 header and output buffers, so no per-GPIO wiring is needed; ribbon cables and panel power still get connected, per Waveshare's connection guide. Uses its own pin map - see below |
| 2x Waveshare P2.5 64x64 HUB75E panels | Chained into one 128x64 canvas, 1/32 scan, FM6126A driver (init handled by the firmware) |
| 5V power | Two options - see below |
| Enclosure (optional) | 3D-printable case for the clock. Stands on its own, hangs on a wall or a Multiboard: MakerWorld model 3363461 |
| Panel joiner (optional) | 3D-printable bracket that locks the two panels into one flat 128x64 frame: MakerWorld model 3264534 |
The tested build runs directly from the ESP32's 3.3V GPIO signals. Keep signal wires short; the wiring guide covers optional buffers if your panels show flicker or ghosting, plus bench setup and first-light checks.

Download PNG · Open scalable SVG

Photos of the hand-soldered prototype - an ESP32-S3, a USB-C power breakout, the 2200µF capacitor, an XT60 panel feed and the HUB75 header on a piece of protoboard, wired point to point:
- Board, component side: boardA.jpg · solder side: boardB.jpg
- Board size, about 50 x 41 mm: board1.jpg · board1a.jpg
- Connected to the panels: display1.jpg · display2.jpg


- Prototype shown above: a phone charger plugs into a separate USB-C power breakout. Its 5V/GND rails feed the ESP32's 5V/GND pins and a two-pole panel power connector. Each panel gets a dedicated power feed; panel current does not pass through the ESP32 or HUB75 ribbon. A 2200µF, 25V capacitor is connected across the 5V/GND rails (positive to 5V). The supply remains 5V. Complete the wiring with power off, then connect the charger.
- Observed consumption: the prototype works from a phone charger. The owner estimates around 10W in use and reports measurements staying below 30W; this is not a measured maximum for sustained full-white content.
- Bench alternative: the wiring guide describes a dedicated 5V supply (10A example) feeding both panels separately, with the ESP32 powered by USB and all grounds connected together.
- Waveshare ESP32-S3-RGB-Matrix: the board handles panel power itself. It has two USB-C ports - one for programming and data, one for power - plus screw-post power terminals. Follow Waveshare's own documentation for which input to use; do not guess from the connector shape. The two small wire connectors on the board are not power inputs: the PH2.0 header is the speaker output and the SH1.0 header is the RTC backup battery. Feeding 5V into either will damage the board.
Hand-wired boards (WROOM devkit, ESP32-S3-Zero, Super Mini):
| Function | Signals | GPIO |
|---|---|---|
| Upper half RGB | R1 / G1 / B1 | 1 / 2 / 4 |
| Lower half RGB | R2 / G2 / B2 | 5 / 6 / 7 |
| Row address | A / B / C / D / E | 8 / 9 / 10 / 11 / 12 |
| Clock / Latch / Output-enable | CLK / LAT / OE | 13 / 14 / 38 |
| Common ground | HUB75E pins 4 and 16 / power ground | GND |
The E address line is required for 64x64 (1/32 scan) panels: HUB75E pin 8 → GPIO12, not ground.
Waveshare ESP32-S3-RGB-Matrix (fixed by the board, nothing to wire):
| Function | Signals | GPIO |
|---|---|---|
| Upper half RGB | R1 / G1 / B1 | 4 / 5 / 6 |
| Lower half RGB | R2 / G2 / B2 | 7 / 15 / 16 |
| Row address | A / B / C / D / E | 18 / 8 / 3 / 42 / 9 |
| Clock / Latch / Output-enable | CLK / LAT / OE | 41 / 40 / 2 |
src/display/hub75_pins.h holds the hand-wired map as
the default and defines the override contract; the Waveshare values are supplied by
the matrix-waveshare environment in platformio.ini. A board
environment overrides the map from build_flags by defining HUB75_PINS_CUSTOM
plus all 14 pins. A partial override is a compile error, so a half-edited map cannot
reach the panels.
| ID | Style | Description |
|---|---|---|
| 0 | Mario | Mario jumps to bounce changed digits; optional idle enemy encounters |
| 1 | Standard | Traditional digital clock with date |
| 2 | Large | Extra-large digits |
| 3 | Space Invaders | Shoots lasers to change digits; choose an invader or spaceship character |
| 5 | Pong / Arkanoid | Breakout-style ball physics, digits shatter and reassemble |
| 6 | Pac-Man | Pac-Man eats pellet-based digits |
| 7 | Snake | Nokia-style snake hunts pellets left by changed digits |
| 8 | Tetris | Block digits rebuilt by slabs or falling dots, idle falling blocks with a separate configurable color per shape; optional small corner-clock mode hands the whole panel to an auto-played game with a much taller stack |
| 9 | Cycle All Styles | Choose enabled styles, their order and duration in Clock settings; Weather is skipped until configured |
| 10 | Asteroids | Wireframe ship shoots changed digits into spinning line shards |
| 11 | Dino Runner | A T-Rex runs and jumps cacti; a pterodactyl swaps changed digits |
| 12 | Matrix Rain | Digital rain with fading glyph trails; changed digits decode out of the rain |
| 16 | TRON | Two neon light cycles leave fading trails, avoid walls and crash into sparks; one traces changed digits as a continuous line |
| 15 | Bomberman | Brick digits explode with cross-shaped blasts and rebuild; a tiny hero navigates between digits, bombs crates and collects bonuses |
| 17 | Doom Fire | The PSX Doom fire effect: the digits are heat sources burning white-hot over a fire line, and a changed digit burns away before the new one re-ignites |
| 14 | Weather Clock | Time plus live local weather: animated condition icon, temperature, daily range, humidity, sunrise/sunset |
ID 4 is a legacy alias for the Space Invaders renderer and is not a separate choice in the web interface. ID 13 is retired; use the IDs listed above.
Style colors are editable in the web interface (digits, characters, effects, backgrounds), so each clock can match your setup.
The style names describe what each animation is styled after. This project is not affiliated with or endorsed by the rights holders; see Trademarks and attribution.
Every animated style rebuilding all four digits at the 09:59 to 10:00 rollover, shown at twice the panel's pixel size.
 0 Mario |
 3 Space Invaders |
 5 Pong / Arkanoid |
 6 Pac-Man |
 7 Snake |
 8 Tetris |
 10 Asteroids |
 11 Dino Runner |
 12 Matrix Rain |
 16 TRON |
 15 Bomberman |
 17 Doom Fire |
Standard and Large have no change animation, and the Weather clock is not shown here. All colors above are the defaults.
Once on WiFi, open the device's IP address or http://pixelclock.local in a browser:
- Clock settings: style, 12/24 hour, date format, position, per-style animation options, per-element colors with one-click reset to defaults
- Display: brightness (live slider), colon blink mode/rate, adaptive refresh rate, scheduled night dimming (start/end time to the minute + dim level) and a scheduled power-off window that blanks the panel overnight to spare the LEDs
- Audio visualizer: effect style, its colors and the oscilloscope options
- Timezone: built-in region list with automatic DST transitions (POSIX TZ rules, no manual toggles)
- Network: DHCP or static IP, device name (mDNS), show IP at boot, NTP time servers (see below)
- PC monitor layout: which metrics are visible and where, 5-row / 6-row / large text modes, progress bars, drag-and-drop placement on a live preview
- Config export/import as JSON (includes the color palette)
- Firmware update: upload a
.binover the air
The clock gets the time over NTP and applies the timezone rules locally. By default it
asks pool.ntp.org, then time.nist.gov.
The Network page has a Time servers (NTP) card with a primary and a secondary field. Either accepts a hostname or an IP, so you can point the clock at a local time source (a router, a pfSense box, an internal NTP server) instead of the public pool. Leave the primary blank to fall back to the compiled default; leave the secondary blank to use no fallback server at all.
Test probes each configured server directly and reports whether it answered, with the UTC time it returned. That check uses its own throwaway socket, so it never disturbs the running clock. Saving the settings reapplies the timezone and forces a resync, which can take a few seconds on a slow server.
Both fields are included in config export/import.
The Weather Clock (style 14) shows current conditions next to the time: an animated icon (sun, clouds, rain, snow, storm...), the temperature, today's high/low, humidity and sunrise/sunset times. When enabled it also joins the Cycle All rotation as an extra screen.
Setup (web interface, Clock page, Weather Clock style):
- Tick Enable weather updates.
- Type your city into Find your location and press Search - it fills in the coordinates (the lookup runs in your browser; the device only stores latitude and longitude). You can also enter coordinates manually.
- Pick Celsius or Fahrenheit. Save.
Data comes from Open-Meteo (no account or API key needed), fetched every 10 minutes. The optional API key field is only for Open-Meteo commercial subscriptions. Icon, effect and temperature colors are editable in the style's Colors card like any other clock.
On the web interface's Display page you can run an ambient screensaver instead of
the clock: a Space Invaders battle, a Pac-Man chase, a starfield, an aquarium with
fish, bubbles and kelp, or a burning room where a very calm dog insists everything is
fine. An optional small clock stays in the corner. Press Start
now to keep the effect on until you stop it, or enable the schedule to have it come
on automatically during set hours (e.g. 20:00-23:00). GET /api/mode/ambient /
/api/mode/auto do the same from automations.
The Custom animation ambient effect plays animations you upload to the device. How much fits depends on the board: the 4MB layout has 128KiB of animation storage, so short clips fit best there (an empty tested device allows about 23 frames), the 16MB devkit has 3.4MB, and the 32MB Waveshare driver board has 23MB. The UI reports the current upload budget, including space needed for a temporary file.
In the desktop companion, save pixelclock.local (or your clock's IP) on
Connection, then open Animations. Refresh storage, select a GIF, choose
crop/pad/stretch and its anchor, and create a preview. Automatic frame skipping
fits the clip to available space while preserving its duration. Upload the result
and use Play to try it. To keep it as the ambient effect, select it on the
clock's Display page and save. GIF input is limited to 8MiB; trim large clips first.
Alternatively, convert a GIF with the command-line tool:
pip install pillow
python tools/gif2pca.py my.gif                        # writes my.pca
python tools/gif2pca.py my.gif --preview check.gif    # eyeball the result first
python tools/gif2pca.py my.gif --upload http://pixelclock.local   # convert + upload
The converter fits the GIF to the 128x64 panel (--fit crop|pad|stretch, with
--anchor start|center|end choosing which edge survives a crop - use --anchor end
to keep a caption at the bottom), quantizes all frames to one 16-color palette and
packs them into a compact .pca file (4KiB of pixel data per frame, 1.5MiB max, up to 360
frames; use --frame-skip 2 for long GIFs).
Upload either with --upload, with the file picker on the Display page (select the
ambient effect "Custom animation" to see it), or with curl:
curl -F "anim=@my.pca" "http://pixelclock.local/api/anim/upload"Then pick the animation in the dropdown, Save, and Start now. Uploaded
animations survive reboots and normal firmware-only OTA updates; replacing or
erasing the filesystem removes them. Manage them with
GET /api/anim/list and GET /api/anim/delete?name=<name>.
Select Custom rotation (style 9) in Clock settings. Enable the desired styles, move them with Up/Down, and set each duration from 5 to 3600 seconds, then save. At least one non-weather style must remain enabled. Rotation resumes from the first available style after another display mode interrupts it. Settings are included in configuration export/import.
Expand Diagnostics under Device status in the web portal for firmware,
flash/storage capacity, heap usage, reset reason, time/weather state and animation
errors. Download diagnostics saves the same information as JSON, without WiFi
credentials. It is also available at GET /api/diagnostics.
A WS2812B strip on one spare GPIO, for a glow under or behind the panel. It is off until you enable it, and it is driven from the RMT peripheral so its bit timing never competes with the panel's DMA scan.
Take the strip's 5V and ground from the same terminals that feed the panels, as a parallel branch from one node. Do not run strip current through the board's pin header, its 3V3 pin or the HUB75 ribbon: the voltage drop along a shared wire dims the panels, and the ground offset shifts the strip's data threshold.
  5V  --+-------------------- panels
        |
        +--- D1 --- D2 --+--- strip +5V   (two series Schottky, ~4.1V)
                         |
                         +--- 1000uF --- GND

  GND --+-------------------- panels
        +-------------------- strip GND
        +-------------------- board GND

  GPIO --[ 330R ]------------ strip DIN
A 330R resistor in the data line and a short data wire are usually enough: the reference build runs 38 LEDs straight from the 3.3V GPIO. Strictly, a WS2812B expects 0.7 x its supply on DIN, which is 3.5V at 5V, so if the strip flickers or shows wrong colours, add margin. Two series Schottky diodes (1N5822 or similar) drop the strip to about 4.1V, which brings its threshold down to roughly 2.9V and puts the 3.3V data line back inside spec. A 74AHCT1G125 on the data line does the same job the other way round. One diode is not enough: its forward drop falls with current, so a dimmed strip loses the margin again. The diagram above shows the diode option.
Anything that is not a HUB75 signal, the flash and PSRAM bus (GPIO26-37), the native USB pair (GPIO19/20), the UART0 serial pins (GPIO43/44, which carry the boot log), GPIO0 or GPIO45. The portal marks those as taken and lists the free pins; a saved one switches the strip off rather than breaking the panel.
| Board | Default | Where it is |
|---|---|---|
| Waveshare ESP32-S3-RGB-Matrix | GPIO46 | the GND / 3V3 / IO46 / IO45 header |
| Hand-wired boards | GPIO21 | free in the hand-wired HUB75 map; on a Waveshare ESP32-S3-Zero it is the onboard RGB LED, so pick another free pin there |
On the Waveshare board GPIO46 is the better of the two header pins: it carries a fitted 10K pull-down, so the data line sits at the strip's idle level through reset instead of floating, and its strapping role (download boot, together with GPIO0) is unaffected by a line that idles low. GPIO45 is the flash-voltage strap, so the portal refuses it.
LED strip in the web portal:
| Setting | What it does |
|---|---|
| Enable the strip | Off leaves the strip dark and holds its data pin low |
| Data GPIO | The pin driving DIN |
| LEDs on the strip | Up to 300; the hint quotes the full-white draw for that many |
| Current limit at 5V | Dims the whole strip whenever a frame would exceed it; 0 removes the cap |
| Effect | Solid, Wave (a soft band drifts along it), Rainbow, Fire, Meteor, Scanner, Hour sweep, Weather or Audio VU (see below) |
| Effect speed | 0.1 to 2.0; 1.0 is the calm default pace |
| Rainbow size / Sparking / Tail length | The second knob of Rainbow (0 turns the whole strip through the colours together, 50 lays one rainbow along it, 100 two), Fire (how often new sparks feed the flame) and Meteor or Scanner (how far the tail trails) |
| Grow from the centre | Rainbow, Fire, Meteor, Scanner, Hour sweep and Audio VU run both ways from the middle as a mirror image; off runs left to right |
| Brightness | Applied before the current limit |
| Strip color | The colour of Solid, Wave, Meteor, Scanner and the Hour sweep bar |
| Hour sweep seconds dot | The colour of the Hour sweep seconds dot |
The strip follows the panel: it fades out whenever the panel is off, whether the night
schedule, /api/display/off or a brightness of 0 put it out, and inside the night dimming
window it dims by the same ratio as the panel.
Fire is the classic Fire 2012 simulation: the flame starts at LED 0, or in the middle with Grow from the centre on, and ignores the strip colour.
Hour sweep fills the strip in the strip colour over each hour, over a faint glow for the rest of the hour, and on the hour the full bar drains back to the start. A seconds dot runs the length of the strip once a minute and fades out at the end. Until the clock has the time the strip shows the plain strip colour.
Weather ignores the strip colour and shows the outside temperature instead: blue below -10C, cyan at 0C, green at 10C, yellow at 20C, orange at 28C and red from 35C. Clouds drift over it as a slow dimming wave, rain and snow twinkle, and a storm flashes now and then. It uses the panel's weather settings: pick the Weather clock style once to reveal them, turn weather on, set a location and save. Fetching carries on after you switch the clock back to another style. Until the first forecast arrives it shows the plain strip colour.
Set the current limit to what is left over after the panels, not to what the strip could draw. A 5V/3A supply running the panels at around 0.7A leaves roughly 2A, and 28 LEDs need 1.4A at full white. All of it is included in configuration export and import.
With the companion app streaming audio, effect Audio VU turns the strip into a level
meter. It runs off the same FFT1 packets as the panel visualizer but is independent of it:
the meter works while the panel carries on showing the clock, so you are not choosing between
seeing the time and seeing the music.
| Setting | What it does |
|---|---|
| Grow from the centre | The bar opens both ways from the middle. Suits a strip mounted symmetrically under the panel; off fills left to right |
| Sensitivity | 25 to 250%. Raise it if the bar barely moves, lower it if it sits pinned at the ends. Default 100; heavily compressed music usually wants less |
| Without music | The effect the strip runs until music plays: Off or any effect above. Default Solid |
| Start after | Seconds sound has to last, with no gap over a second, before the meter takes the strip. Default 3; 0 reacts to every sound |
| Stop after | Seconds of quiet before the strip goes back to the effect above. Default 5, long enough to ride out the pause between tracks |
The companion streams audio all the time, silence included, so the meter arms itself the way the companion's visualizer auto-start does: a notification chime or a message pop is over long before the start delay, and never lights the bar. When the companion has already switched the panel to the visualizer, sound starts the meter at once. The two crossfade, so the hand-over never snaps.
The meter uses the three Audio visualizer bar colours rather than the strip colour, so the panel EQ and the strip stay one palette.
It is a compressed meter, not an absolute one. The level comes from the RMS of the waveform in each packet, and the companion normalises that against a reference that follows recent peaks and decays over roughly a second. So the meter tracks the music closely but auto-levels across volume changes: turning the system volume down drops it only briefly. A companion too old to send a waveform falls back to the frequency bands, which are normalised far harder and give a much lazier meter.
With the companion app running on your PC, the display switches to live hardware stats (CPU/GPU temps and loads, RAM, disks, fans, network throughput; up to 20 metrics) and returns to the clock when the PC goes offline.
Companion app v4 (Windows + Linux) lives in
PC-Companion-App-v4/: a tray app with a
web-style config window, live device preview, drag-and-drop layout editor and
sensor picker.
- Windows: download and run
pc_stats_monitor_v4.exe, no Python needed. Install LibreHardwareMonitor and run it as Administrator for temperature/fan/power sensors (on 0.9.5+ enable Options > Remote Web Server > Run). - Linux:
cd PC-Companion-App-v4/linux-companion, thenpython3 -m pip install -r requirements.txtandpython3 pc_stats_monitor_v4_linux.py.
The release includes the Windows companion alongside the firmware. Follow the Windows companion instructions to run from source or rebuild it.
Metrics are sent as JSON over local UDP (port 4210), at the companion's configured update interval. Both companions default to 3 seconds. CPU usage depends on the host, enabled sensors and update interval.
Do not want the stats screen? Untick Send PC stats to the display on the Connection page. The companion stops reading sensors and stops sending packets, so the device falls back to its clock or scheduled ambient screen. Combined with the audio visualizer below, that gives a display that is either the equalizer while music plays or the clock the rest of the time.
With the companion app streaming your PC's sound, the display becomes a 32-band spectrum analyzer: smooth bars with a green/yellow/red gradient (colors editable), falling peak dots, and an optional small clock in the corner.
Choose Visualizer style in the device web UI's Display -> Audio visualizer card, then Save settings:
- Classic EQ: the original 32 bars, editable colors and falling peak dots (default).
- Neon Mirror: segmented cyan and magenta bars pulse outward from a central horizon, with bright peak markers for a synthwave look.
- Phosphor Waterfall: a scrolling spectrum history in green, mint and amber, inspired by vintage computer displays. Bass is on the left, treble on the right; new sound enters at the top and fades downward.
- Purple LED Stage: a curved concert light wall. Each column follows its own band, bass opens the wave and treble adds pale pink highlights.
- Starfield Overdrive: flight through stars whose trails stretch on every bass onset.
- Oscilloscope: the live waveform on a lab-scope graticule, with a phosphor trail behind it. The trace is trigger-aligned on the PC so it stands still instead of sliding, and it takes its colors from the same three editable slots as Classic EQ (grid from the low color, trace from mid, peaks from the top one).
Classic EQ and the Oscilloscope each have their own color pickers, and the Colors and options card shows the set that belongs to the selected style; the others use fixed palettes. All of them support the small clock and the same companion audio stream. Style selection survives restarts and is included in settings export/import; older settings keep Classic EQ by default on a fresh device.
Selecting the Oscilloscope also reveals its own options, all of which default to the look above:
- Graticule: its own color, or switched off for a bare trace (default on).
- Trace colors: the trace itself and the color it fades to at full deflection (default yellow fading to red).
- Flat trace color: drops that fade so the trace is one color (default off).
- Fill to centre line: a solid silhouette instead of a bare line (default off).
- Phosphor trail: 0 to 4 ghost traces behind the live one. 0 is a single sharp line, 4 smears the most (default 3).
- Vertical gain: 50 to 200 percent trace height. Above 100 the loud parts flatten against the top and bottom edges, like a scope driven too hard (default 100).
Restore oscilloscope defaults on save puts all of those back, colors included, without touching any other setting.
The Oscilloscope needs the waveform that the companion app from this release sends alongside the spectrum. An older companion streams the spectrum only, and the device then says so on screen instead of drawing a trace; the other styles keep working with either version.
Turning Show small clock off also hides the fixed guide lines in Neon Mirror and Phosphor Waterfall. Waterfall then uses the full display height, and the Oscilloscope re-centers its graticule on the full panel.
Setup:
- On the PC: tick Audio visualizer stream on the companion's Connection
page and save. The Windows executable build bundles the audio dependencies;
when running from source, install
soundcardandnumpyif needed (python -m pip install soundcard numpy). It captures whatever the PC is playing (WASAPI loopback on Windows, PulseAudio monitor on Linux) - no cables, no microphone. - On the device: Audio visualizer page -> Start visualizer
(or
GET /api/mode/vizfrom an automation).
The visualizer stays on until you stop it; if the audio stream disappears for 10 seconds the display falls back to automatic display selection: PC stats while the companion is online, otherwise the scheduled ambient effect or clock. The visualizer returns automatically when the stream resumes.
Step 2 can be automatic. Under the stream checkbox, tick Start the visualizer when music plays and save. The companion then watches how loud the captured audio is and switches the display for you:
| Setting | Default | What it does |
|---|---|---|
| Start delay | 3 s | Sound must keep playing this long before the companion calls /api/mode/viz. Short sounds (Windows pops, chat notifications) never reach it. |
| Stop delay | 20 s | Quiet for this long calls /api/mode/auto, handing the display back to PC stats, ambient or the clock. |
| Sound threshold | -45 dB | Anything quieter counts as silence. Lower it (-55) if quiet music is missed, raise it (-35) if background sounds trigger it. |
Quiet gaps shorter than a second (between tracks, pauses in a song) do not restart the start delay, and the companion only releases the display if it was the one that switched it. The Connection page shows the current sound level in dB, so you can read it while music plays and set the threshold below it.
After a temporary network failure (for example, waking the PC), failed automatic
mode changes are retried until they succeed or a newer mode replaces them. The
stream keeps its last resolved device IP through temporary .local lookup failures.
If the clock restarts during playback, automatic mode restores the visualizer
after detecting its new uptime (checked every 10 seconds).
Open pixelclock.stolaris.dev in Chrome or Edge on a desktop, pick your board, plug it in over USB and press Install. It flashes a prebuilt firmware image straight from the browser, then walks you through joining WiFi and connecting the PC companion. Nothing to install, no PlatformIO, no drivers beyond the ones your OS already ships.
The web flasher always erases the whole board first: WiFi credentials, settings and uploaded animations are all wiped. It is meant for first installs; to update a clock that already runs AnimatedPixelClock, use OTA updates instead.
Board choices on that page:
- ESP32-S3-Zero / Super Mini (4MB) - the compact build. Native USB: if the serial port never appears, hold BOOT while plugging the board in.
- ESP32-S3-WROOM devkit (16MB) - the full-size devkit; its larger flash also provides more space for custom animations.
- Waveshare ESP32-S3-RGB-Matrix - the purpose-built driver board. Native USB, same BOOT-hold trick if the port does not appear. Its 32MB flash leaves 23MB for custom animations.
The same page has a serial log viewer, useful if the display stays dark after a flash. It also provides a direct Windows companion download after flashing. Full images, OTA-only images for every board, the EXE and SHA-256 checksums are available in GitHub Releases. Release packaging is documented in docs/firmware/README.md.
Built with PlatformIO.
# ESP32-S3-WROOM devkit (default, 16MB)
pio run -e matrix-s3-wroom -t upload

# Compact 4MB boards (ESP32-S3 Super Mini, Waveshare ESP32-S3-Zero)
pio run -e matrix-s3 -t upload

# Waveshare ESP32-S3-RGB-Matrix driver board
pio run -e matrix-waveshare -t upload
Omit -t upload to build only. The WROOM environment currently sets upload and
monitor ports to COM9; change them in platformio.ini or
override the upload port with --upload-port <port> for your computer.
The compact 4MB boards use native USB (no separate USB-UART chip): if the first flash isn't detected, hold BOOT while plugging in USB, then use OTA for later updates.
The Waveshare driver board also uses native USB, and its UART0 pins are reused for
the onboard audio and SD card, so the firmware console is USB CDC. Its module has
octal flash, which the matrix-waveshare environment selects with
board_build.arduino.memory_type = opi_opi; the image is written with a 32MB flash
header, and large_littlefs_32MB.csv splits the part into two 4.5MB OTA slots and
23MB of animation storage.
The matrix-s3-bringup / matrix-wroom-bringup / matrix-waveshare-bringup
environments build a standalone panel self-test (bringup/hello_matrix.cpp) with six
test patterns, useful for verifying wiring before flashing the full firmware.
With no saved WiFi credentials, the device opens an access point named
PixelClock-Setup (passwordless by default). Join it
and a captive portal (or 192.168.4.1) lets you enter your WiFi credentials.
Improv-Serial provisioning over USB is also supported, which is what the web
flasher uses to hand over your network right after installing.
After the initial flash, update over WiFi from the web interface's Firmware Update section, or from the command line:
curl -F "firmware=@.pio/build/matrix-s3-wroom/firmware.bin" http://<device-ip>/updateUpdating from a GitHub release:
upload OTA_ONLY_firmware-v<version>-<board>.bin. Do not upload the full
firmware-v<version>-<board>.bin - that one carries the bootloader and partition
table and belongs at 0x0 over USB. wroom is the ESP32-S3-WROOM-1 N16R8 (16MB)
build, supermini the ESP32-S3-Zero / Super Mini (4MB) build, and waveshare the
Waveshare ESP32-S3-RGB-Matrix build. Downloads can be verified against
SHA256SUMS.txt.
Simple GET endpoints for home automation (Home Assistant, Node-RED, cron + curl). These controls do not save settings themselves. Mode/display overrides reset on reboot; brightness and style changes update the in-memory settings and can be persisted by a later settings save. No authentication, so keep the device on a trusted LAN.
| Endpoint | Description |
|---|---|
/api/status |
Current display/mode state as JSON |
/api/display/off / /api/display/on |
Blank / restore the panel |
/api/display/brightness?value=0-100 |
Set brightness (percent) |
/api/mode/clock / /api/mode/auto |
Force the clock / resume automatic mode |
/api/mode/ambient |
Force the ambient screensaver on now |
/api/mode/viz |
Force the audio spectrum visualizer (needs the companion streaming) |
/api/clock/style?id=<id> |
Switch the clock style; use an ID from the table above (13 is retired) |
/api/ntptest?server=<host> |
Probe an NTP server and report whether it answers |
/api/reboot |
Soft-restart (settings kept) |
curl http://pixelclock.local/api/display/off
curl "http://pixelclock.local/api/display/brightness?value=30"
curl "http://pixelclock.local/api/clock/style?id=8"
Home Assistant example:
rest_command:
  clock_display_off:
    url: "http://pixelclock.local/api/display/off"
  clock_display_on:
url: "http://pixelclock.local/api/display/on"Panels from other batches may use a different driver chip or need a faster refresh. Set them in the web portal under Maintenance > Display panel, which also shows the measured refresh rate and offers test patterns. The options are applied at boot, so saving them reboots the clock. They are part of the settings export; an import stores them for the next reboot.
The NONDK P2.5 128x64 panel (DP5125 chips) needs driver 0. It also needs 5V logic levels: driven straight from 3.3V GPIO its left half corrupts, so use a board with buffers (the Waveshare driver board works) or add 74AHCT245 buffers.
The same options are available over HTTP:
| Endpoint | Description |
|---|---|
GET /api/panel |
Current options plus the measured refresh rate (refreshHz) |
POST /api/panel?<option>=<value> |
Save any of the options below, then reboot |
GET /api/panel/test?pattern=0-8 |
Test pattern until reboot: 1 white, 2 grey, 3 dim grey, 4 red, 5 green, 6 blue, 7 ramps, 8 checkerboard, 0 off |
| Option | Values | Default |
|---|---|---|
driver |
0 plain shift register (ICN2037, DP5125 and similar), 1 FM6124, 2 FM6126A, 3 ICN2038S, 4 MBI5124, 5 DP3246 | 2 |
clockMHz |
8, 16, 20 | 8 |
latchBlanking |
1-4 | 2 |
clkPhase |
0, 1 | 0 |
colorDepth |
4-8 bits | 8 |
minRefresh |
30-200 Hz; higher trades the lowest colour bits for less flicker | 60 |
curl -X POST "http://pixelclock.local/api/panel?driver=0&minRefresh=200"A wrong driver can leave the panel dark. Set driver=2 to go back to the default.
Push a message banner onto the display from anything that can send an HTTP request. The banner appears over the active screen (including ambient effects and the visualizer), scrolls if the text is too long, and disappears on its own.
curl -X POST http://pixelclock.local/api/notify \
  -H "Content-Type: application/json" \
-d '{"text":"Doorbell!","icon":"bell","color":"#FFAA00","duration":8000}'| Field | Required | Description |
|---|---|---|
text |
yes | Message, up to 200 bytes (200 ASCII characters) |
color |
no | Banner color as #RRGGBB (default white) |
icon |
no | One of bell, mail, alert, heart, check, cross, info, home, music, star |
duration |
no | Display time in ms, 1000-60000 (default 5000) |
position |
no | top or bottom (default: the position set in the web interface) |
GET /api/notify/dismiss clears the banner early. A new POST replaces the current
banner. The feature can be disabled entirely on the web interface's Display page
(Notifications card), where the default banner position is also set.
Home Assistant example:
rest_command:
  clock_notify:
    url: "http://pixelclock.local/api/notify"
    method: POST
    content_type: "application/json"
payload: '{"text":"{{ message }}","icon":"{{ icon | default(''info'') }}","color":"{{ color | default(''#FFFFFF'') }}"}'- ESP32-HUB75-MatrixPanel-DMA (matrix driver)
- Adafruit GFX, WiFiManager (tzapu), ArduinoJson, Improv-Serial
Licensed under the MIT License.
AnimatedPixelClock is an independent, non-commercial hobby project. It is not affiliated with, endorsed by, sponsored by or connected to Nintendo, The Tetris Company, Bandai Namco, Taito, Atari, Konami or any other rights holder.
The clock and ambient style names describe what each animation is styled after, so that you can tell the styles apart. Every sprite and effect in this firmware is drawn procedurally from the source in this repository, with user-configurable colors. No game artwork, sprite sheets, tile data, ROM data, fonts, sounds or music from any commercial game are copied, bundled or distributed here, and the firmware does not emulate or reproduce any of those games.
All product names, game titles, logos and brands referenced in this project are the property of their respective owners. They are used here only to describe the visual style of an animation, and their use does not imply any endorsement, sponsorship or affiliation.