


An EEG lab on a Raspberry Pi. Stick, clip, plug in, see your brain.
Equipment · Step by step · How it works · Code · Missions · Troubleshooting
- Set up: follow the first test.
- Record: use the Python setup and recording commands.
- Check: read the completion message. If time is missing, repeat the recording before comparing results.
- Explore: compare spectra or try a mission. “No clear alpha rhythm detected” is a valid result.
- Overview
- Equipment
- Safety
- Step by step: from the parts to your first alpha wave
- Code: live view, recording and analysis on the laptop
- Missions
- From a recording to DANDI: how a recording becomes published data
- Repository structure
- References and citation
This kit records EEG with the open source PiEEG-8 shield, built around the Texas Instruments ADS1299, the same 24 bit biopotential converter used in OpenBCI and many research amplifiers. The Raspberry Pi runs PiEEG Server and streams 250 samples per second over WiFi. Everything else happens on the laptop: a browser dashboard for the first look, and Python for live plots, recording, spectral analysis and conversion to the NWB research data standard.
There's no EEG cap in this kit on purpose. It starts with electrode stickers on skin without hair (forehead and behind the ears), which is enough for blinks, eye movements, muscle activity and the alpha rhythm. More channels on bare skin (temples, eye corners) are Mission 4. Positions through hair need dry electrodes, a later upgrade.

| Channels | 8 + Reference + Bias available, 1 to 2 used to start (Fp1, Fp2) |
| Resolution / rate | 24 bit, 250 Hz |
| Electrodes | Ag/AgCl stickers, forehead and mastoids |
| Power | Battery only (powerbank) |
| Analysis | Python 3.10+, NumPy, SciPy, Matplotlib, PyNWB |
| Status | Pi, PiEEG Server, code and tests validated on 31 October 2026. The PiEEG-8 itself has not been on this Pi yet, so everything the board does (noise test, first alpha) is written from PiEEG's documentation and awaits part 2 of docs/validation.md |

| # | Part | Spec | Source |
|---|---|---|---|
| ① | Raspberry Pi 3 Model B + 16 GB MicroSD | BCM2837, 1 GB, 2.4 GHz WiFi, set up with PiEEG Server | your own |
| ② | PiEEG-8 board | ADS1299, 24 bit, 250 Hz, 8 ch + Ref + Bias, 2.54 mm male header | Elecrow |
| ③ | Ag/AgCl electrode stickers, 60 pcs | 2.6 cm foam, snap button, single use | Somnomedics SEN010C |
| ④ | Dupont to alligator clip cables, 10 pcs | female 2.54 mm ↔ clip, 20 cm | BerryBase DUPAC20 |
| ⑤ | Dupont extension jumpers, 2 ribbons of 40 | male to female 2.54 mm, one ribbon 20 cm and one 50 cm, peel off one per lead | BerryBase DUPK-40-FM-20 and DUPK-40-FM-50 |
| ⑥ | Powerbank + official Micro USB cable | 5 V, 3 A recommended by PiEEG (Raspberry Pi specifies 2.5 A for the Pi 3) | BerryBase RPI-MUSB-1 |
| ⑦ | Alcohol wipes | skin prep | dm |
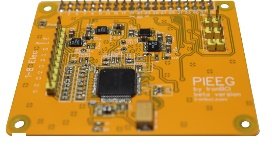

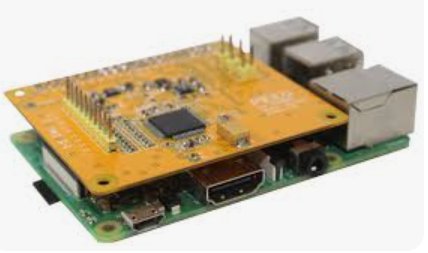
What each part does and why it was chosen: docs/equipment.md
Caution
Battery only. The PiEEG-8 has no electrical isolation. While electrodes are on your skin, the Raspberry Pi runs from a powerbank that is not charging, and the laptop runs on battery, charger unplugged. No wall power, no HDMI and no Ethernet cable anywhere in the setup. docs/safety.md
Warning
Pacemaker or other implanted electronic device? Don't wear the electrodes without your physician's approval (PiEEG safety rule). You can still do everything as the researcher: record someone else and start with PiEEG's real example data.
Note
PiEEG is a research and education tool, not a medical device. Nothing it shows is a diagnosis.
Prepare the MicroSD first with the Raspberry Pi setup guide, about 45 to 90 minutes. After that the Pi answers to raspberrypi.local. "You" below is whoever wears the electrodes. The researcher and the participant can be two different people, see recording someone else. With the card ready, the first alpha wave takes about 10 minutes. These steps follow the official PiEEG-8 How to Start, adapted to this kit.
Pi unplugged. Line the PiEEG-8 up with the 40 pin header so it sits over the Pi, then press it straight down until every pin is seated.

Correctly mounted. Photo: PiEEG.
In every session, power goes in last and comes out first (connection order).
Wipe the skin with an alcohol wipe and let it dry. Then three stickers:
| Sticker | Position | Name |
|---|---|---|
| Left forehead, lower edge just above the eyebrow, centered over the pupil | front left | Fp1 |
| Bony bump behind the left ear | left mastoid, M1 | Ref |
| Bony bump behind the right ear | right mastoid, M2 | Bias |
PiEEG's official setup puts Ref and Bias on ear clips at the earlobes. A sticker doesn't fit an earlobe, so this kit uses the mastoids right behind them, the other standard EEG reference site.

Each lead has two parts: an extension jumper (⑤) and a clip cable (④). The jumper's female end goes onto the pin, the clip cable's black female end onto the jumper's male end, and the alligator clip onto the metal snap in the middle of the sticker. Push each joint fully home.

| Pin on the board | Clip goes to |
|---|---|
| E1 | left forehead (Fp1) |
| Ref | behind left ear |
| Biasout | behind right ear |
| E2 | optional: right forehead (Fp2) |
| E3 to E8 | empty |
Each lead is about 40 cm: a 20 cm jumper plus a 20 cm clip cable. The clip cables alone don't reach: measured on an adult head and shoulders model (MakeHuman), along the skin and then through the air to the pins, the paths are
| Where the Pi is | Fp1 (E1) | M1 (Ref) | M2 (Bias) |
|---|---|---|---|
| Sitting: shelf at shoulder height, just beside your left shoulder | 28 cm | 20 cm | 33 cm |
| Lying on your back: pillow, beside your left ear | 19 cm | 9 cm | 23 cm, around the front of the neck |
Behind the head doesn't work: Fp1 is about 45 cm away. Every lead should hang loose. If one pulls on its sticker, move the Pi closer or chain a second jumper onto that lead. Power goes in last: plug the Micro USB cable into PWR IN and into the powerbank (charged, and not plugged into the wall). The LED on the PiEEG-8 lights up.
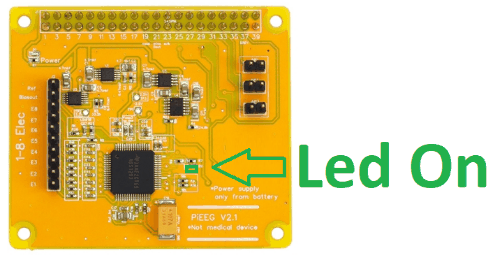
Image: PiEEG.
Wait about a minute while the Pi boots and joins the WiFi.
Connect to the Pi from the laptop. Open a terminal (on a Mac: ⌘ + Space, type Terminal, Enter; on Windows: PowerShell) and type:
ssh <username>@raspberrypi.localReplace <username> with the user chosen when the card was flashed. The first time, type yes to trust the Pi, then the Pi's password (nothing appears while you type it). The Pi answers with its welcome: whether the server, the page and the power are OK, the links, a session in four steps and the commands you need on the Pi. exit leaves. The same links work without the terminal: http://raspberrypi.local:8080 is the kit's own page (manual, checklist, live signal), and the dashboard is step 6.

On the laptop, after the code setup:
python check_setup.py --noise-testChecks the whole chain in one go: WiFi, Pi, PiEEG Server, 8 channel mode, samples from the board, and PiEEG's official noise check, where the ADS1299 shorts its own inputs and measures what's left. Every line [ok] means the hardware is ready, whatever the stickers are doing. The noise check shorts the inputs for every program reading the stream for a few seconds, so never run it during a recording.
The dashboard is the kit's graphical view. The Pi itself runs without a desktop (Raspberry Pi OS Lite, to leave its 1 GB of RAM to the server), so everything visual happens in the laptop's browser.
On the laptop (charger unplugged, same WiFi) open http://raspberrypi.local:1617 in Safari or Chrome and click Connect. Then:
- Check it shows 8 channels (16 means the server isn't in PiEEG-8 mode, see troubleshooting).
- Bandpass is already on: PiEEG Server starts with 1 to 40 Hz, and the button shows that range. Leave it. Inside its menu, the Enabled button shows the current state, and clicking it switches the filter off.
- Notch: open it, set Freq to 50, then click Disabled so it turns into Enabled. The dashboard starts at 60 Hz, Germany runs at 50 Hz.
These filters run on the Pi and change the data for every program that reads the stream. record.py switches them off while it records, so recordings are raw, and back on afterwards (why).
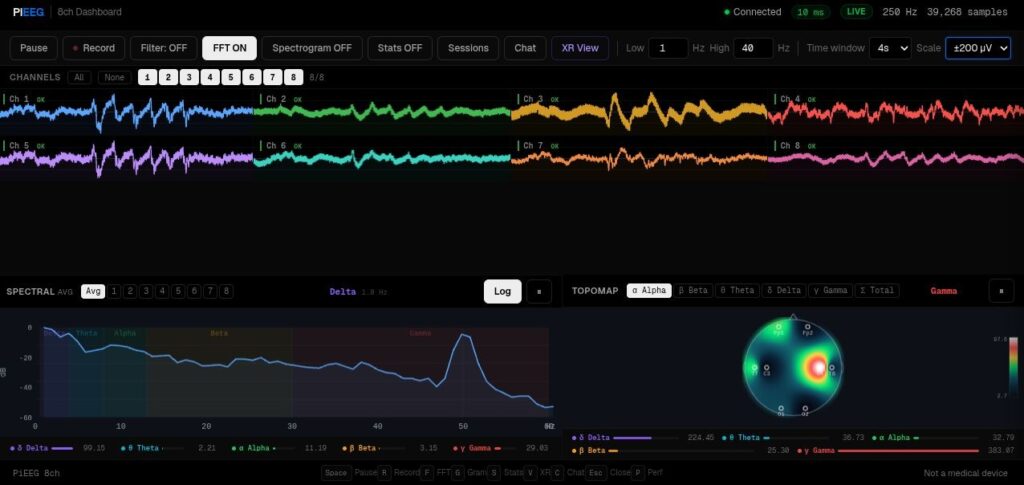
PiEEG Server dashboard. Screenshot: PiEEG, official documentation. With one electrode, only channel 1 shows a real signal. Channels 2 to 8 are empty inputs and look like noise.
Sit still, relax your face, look at one point.
| Test | What you should see on channel 1 |
|---|---|
| Sit still, eyes open | A small, restless line |
| Blink hard | A big slow spike, several times taller than the resting line |
| Look left, then right | Slow steps up and down: eye movement (EOG) |
| Clench your jaw | A burst of fast noise: muscle (EMG), not brain |
| Close your eyes, relax 20 to 30 s | A rhythm around 10 Hz and a peak at 8 to 13 Hz in the spectrum: alpha |
Alpha is strongest at the back of the head. On the forehead it's weaker, so give it time and watch the spectrum rather than the raw line. Full checklist: docs/first-test.md. Something off: docs/troubleshooting.md.
Note
About the µV numbers. PiEEG Server converts each 24 bit sample with 4.5 V / 16 777 215, about 0.268 µV per count. The ADS1299 datasheet puts full scale (+VREF / gain) at code 0x7FFFFF, so one count is 4.5 V / 8 388 607, about 0.536 µV at the gain 1 PiEEG programs. Read against the datasheet, every µV value from the server, and so every µV in this repo, is half the true value. Shapes, timing, frequencies and every comparison between recordings are unaffected. Mission 5 is to verify this independently and report it upstream; until that's done the repo keeps PiEEG's numbers unchanged, so they stay comparable with PiEEG's own dashboard and example data.
Unplug the powerbank, peel off the stickers (single use), then recharge the powerbank with nothing connected to it.
The Pi handles the hardware. Your Python runs on the laptop and reads the live stream over WiFi.
python3 --version # 3.10 or newerIf it's older or missing, install Python 3.12 from python.org or with brew install python@3.12. Homebrew installs it as python3.12 and leaves python3 pointing at the old one, so with Homebrew write python3.12 instead of python3 in the next block.
git clone https://github.com/jurecerkez-code/pieeg-home-lab.git
cd pieeg-home-lab/code
python3 -m venv .venv
source .venv/bin/activate
pip install -r requirements.txt
requirements-lock.txt holds the exact versions the tests passed with. If a future release ever breaks something: pip install -r requirements-lock.txt.
On Windows
Install Python from python.org, then in PowerShell:
git clone https://github.com/jurecerkez-code/pieeg-home-lab.git
cd pieeg-home-lab\code
py -m venv .venv
.venv\Scripts\python -m pip install -r requirements.txt
.venv\Scripts\python check_setup.py
Start every script with .venv\Scripts\python instead of python. raspberrypi.local works on Windows 10 and 11.
Important
The first time Python connects to the Pi, macOS asks "Allow Python to find devices on your local network?" Click Allow. Missed it? System Settings → Privacy & Security → Local Network → turn on Terminal.
Run these commands from the repository’s code folder, after the setup above.
source .venv/bin/activate
python live_view.py                                     # live traces + running spectrum (channels 1 and 2)
python record.py --seconds 60 --label eyes_open         # → recordings/*.csv + .json (add --subject sub-02 for someone else)
python record.py --seconds 60 --label eyes_closed
python spectrum.py recordings/*eyes_open.csv recordings/*eyes_closed.csv
record.py requests raw data by default: it switches PiEEG Server's filters off while it records and back on afterwards. It writes every sample to disk as it arrives, reconnects by itself if the WiFi drops, and notes every gap and event in the .json sidecar. python record.py --help lists the options (electrode positions, notes, more).
An incomplete recording prints how much requested time was not saved. The JSON sidecar records the reason. spectrum.py analyzes continuous sections separately and excludes marked uncertain filter ranges; it does not automatically remove blinks or muscle activity. A candidate peak needs visual checking.
Real recordings from PiEEG, converted to this repo's format:
python get_example_data.py                                   # → recordings/example_*.csv
python spectrum.py recordings/example_*.csv
Or a live simulated stream:
python simulate.py                     # Terminal tab 1: fake PiEEG (alpha, blinks, 50 Hz hum)
python live_view.py --host localhost # Terminal tab 2 (⌘T)| Script | Purpose |
|---|---|
check_setup.py |
Checks laptop, WiFi, Pi, PiEEG Server and board in one go, names the first broken link |
eeg_stream.py |
Client for the PiEEG Server WebSocket stream (ws://raspberrypi.local:1616), reconnects by itself |
live_view.py |
Live bandpass filtered traces and a Welch spectrum |
record.py |
Raw recording to CSV with a JSON metadata sidecar |
spectrum.py |
Power spectrum, alpha peak frequency and alpha power |
get_example_data.py |
Downloads PiEEG's example recordings and converts them |
self_test.py |
Board noise test (inputs shorted), PiEEG's official hardware check |
simulate.py |
Simulated PiEEG Server: same stream, same filters, answers the self test |
mission_1_notch.py |
Mission 1 with automatic PASS/FAIL check |
mission_3_nwb.py |
CSV → NWB, preserving sample times and metadata |
Stream format, CSV columns and sidecar fields: docs/how-it-works.md.
tests/ runs every script against the simulator: raw recordings, filters switched back on, missing samples reported when WiFi drops or the server restarts. GitHub runs them on every push (.github/workflows/tests.yml). Locally, from the repository root:
pip install pytest
python -m pytest tests
Besides the scripts, the suite checks that the documents agree with each other: the pinned PiEEG Server version, the setup commands on the Pi's page against docs/setup-raspberry-pi.md, the Pi's name and ports, the electrode montage, and the citation. Run it before pushing a change to any of them.
| # | Mission | Done when |
|---|---|---|
| 0 | Real data first | Your detector finds 10 chews and 10 blinks in PiEEG's example file |
| 1 | Kill the 50 Hz hum | mission_1_notch.py prints PASS twice on PiEEG's example_dry.csv |
| 2 | Find your alpha peak | Compare eyes open vs closed; report a candidate peak or no clear rhythm |
| 3 | Make it NWB | Your recording passes nwbinspector |
| 4 | More channels on bare skin | 4 channels incl. eye corners, a left/right eye movement plot |
| 5 | Read the datasheet | Every step from 3 raw bytes to one µV value explained |
Details and hints: docs/missions.md. Results, with the recording and plot behind each one: docs/lab-notebook.md
pieeg-home-lab/
├── README.md
├── CITATION.cff
├── LICENSE
├── code/
│   ├── check_setup.py       one command check of the whole chain
│   ├── eeg_stream.py        WebSocket client
│   ├── live_view.py         live plot
│   ├── record.py            raw CSV + JSON recording
│   ├── spectrum.py          alpha analysis
│   ├── get_example_data.py  PiEEG example recordings
│   ├── self_test.py         board noise test
│   ├── simulate.py          simulated PiEEG Server, no hardware needed
│   ├── mission_1_notch.py
│   ├── mission_3_nwb.py
│   ├── requirements.txt
│   └── requirements-lock.txt  exact tested versions
├── tests/                   pytest suite, runs against simulate.py
├── .github/workflows/       runs the tests on every push
├── page/                    the kit's page on the Pi (port 8080), its drawings and the script that renders them
├── deploy/                  how the page and the SSH welcome are installed on the Pi
└── docs/
    ├── equipment.md         every part, specs, why
    ├── how-it-works.md      signal chain, pins, data formats, sources
    ├── first-test.md        detailed first session
    ├── recording-someone-else.md
    ├── setup-raspberry-pi.md
    ├── safety.md
    ├── validation.md        what was checked on this kit's hardware
    ├── lab-notebook.md      sessions and mission results, with the recordings behind them
    ├── missions.md
    ├── troubleshooting.md
    ├── figures/             make_figures.py: draws every figure from its sources
    ├── images/              figures, SVG + PNG
    └── photos/              photos of this kit
- PiEEG-8 documentation: docs.pieeg.com
- PiEEG Python SDK: github.com/pieeg-club/PiEEG-8 · PiEEG Server: github.com/pieeg-club/PiEEG-server
- ADS1299 datasheet: Texas Instruments
- NWB: nwb.org · DANDI Archive: dandiarchive.org
If you use the PiEEG hardware in research, cite:
I. Rakhmatulin, M. Zhanikeev, A. Parfenov. Raspberry PI Shield – for measure EEG (PIEEG). 2021 5th International
Conference on Electrical, Electronics, Communication, Computer Technologies and Optimization
Techniques (ICEECCOT), pp. 410–413. DOI: 10.1109/ICEECCOT52851.2021.9707969
This repository: Valentina Vidović, see CITATION.cff. Code is MIT licensed. Images marked "PiEEG" belong to PiEEG and are shown from their repositories with credit. The bust of Athena in the hero is an AI generated illustration, recolored for this repo; the EEG trace next to it is real data from PiEEG's published example recordings. Every figure is drawn by docs/figures/make_figures.py from documented sources: the Raspberry Pi's official mechanical drawing, MNE-Python's standard 10-20 montage, PiEEG's documentation and PiEEG Server. This is an unofficial starter kit, not affiliated with PiEEG.